Thursday 28 January 2016

Main Image Choices - To Edit.

These are the main images that I have chosen to attempt to edit because my Teaser Poster is mainly the darkened face of the Human Puppet. All of them are pretty close up, however a couple of them are less close up giving me a wider range to edit.


There is different lightings from the top photos to the bottom. This is good as it allows me to edit them in a variety of ways; meaning that the different effects will have different impacts on the image - making it even scarier/more mysterious etc. 


Development of Human Puppet.

I began to develop the face of my Human Puppet character to edit on Pixlr for my posters. To start, I used Baby Talc to make her face paler than usual.

I then used bronzer to make the cheeks a bit dark than the rest of the face. This makes the cheeks and the whole appearance slimmer.

To begin the mouth; I used black eye-liner to sketch a line. I then used brown and black eye-shadow to dab on and around the line; making the face look bruised and dirty. Using red paint, I then put 6 dots on her cheek - 3 on top of the line, and 3 beneath. I the repeated the eye-shadow.


Once that was complete, I cut pieces of string to fit the length of the dots and using glue I attached them all. Some straight and some crossed. 
I repeated this on the other side of her face. (Less stitches so it does not look overly precise). 
Both side of the face were then completed. I added eyelashes onto one of the eyes firstly just as an attempt. Using black and red paint, I coloured the string to look dirty, old and bloody.


Lastly, I added the other set of eyelashes to the other eye. Using the eye-liner again, I added the stereotypical "dolly" freckles on to her cheeks. I also lined her bottom eyelids with eye-liner to suit the "1960's" make up style.


Thursday 21 January 2016

Mock-Up Poster Ideas. Pt 1 - own images and internet.

In my poster mock-up, I used a photo from my phone that I took myself (Dismaland 2015). I added it into Pixlr.com


I then cropped the image in Pixlr to make the main focus the Building and the Ferris Wheel. I then firstly edited my image by changing the colouring to "Old Photo" and adjusting using the "Brightness and Contrast".
I then added a layer onto the image. I did this so that I could add other edits and easily change them without undoing the whole thing. In this layer I used the brush tool/crack effect to add cracks onto the front, side and bridge of the building. This then made the building look more neglected and old, rather than new (like it actually was).
Using an image off of the internet for the time being, I cropped a young girl so that only the top half of her body was left. 
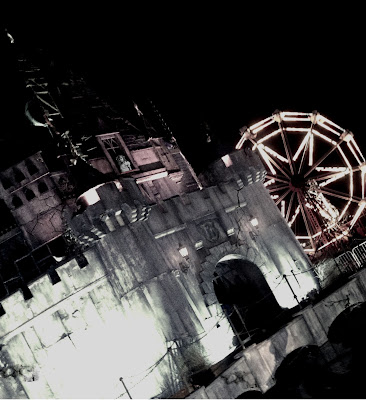
After I finished cropped the girl, I added my 2ND layer. I then added the cropped out, young girl on my image. I used "free transform" and "free distort" to fit her properly into the window of the building. Even though she is not very noticeable and does not play a large part in the image, it adds to the atmosphere that someone is always watching. 
On my 3RD layer, I used the ordinary brush tool in the colour black to remove the top section of the original (castle) to make into a smaller size of a building. This effect also makes the building look less "together". In addition to this, on this layer I made the 'old photo' effect darker again; portraying the idea in my script that there was not much light.
Finally, I added my last layer which was so that I could add the title of my horror film. Once i added the title onto the main image, I changed it colour effect to 'old photo' to match the rest.
Mock-Up Teaser Poster 2.
Using the internet, I researched horror posters of my sub-genre to get a few ideas. Considering the setting on my "human puppet" is in a mysterious, down room - I decided to find a "grunge" picture of a wall and floorboards.
Once I inserted the picture into Pixlr; using the filters I changed the effect of the photo to "old photo" to firstly represent the time era (1960s) and to represent the abandoned atmosphere.


Again, on the internet I found and saved an image of a window and using pixlr I cropped the image so it was just the frame. I also put cracks using the brush tool in two corners of the window frame.

I then (on another layer) added the cropped frame onto the grunge wall background. Using the black brush tool, I went around the edges of the frame to give it a minor shadow. Also using the "dirt" brush tool I added smudges onto the "window pane" to look as if the glass was ruined.
I then researched "street lights  to find an image I could use for "outside the window". On Pixlr I cropped the image down the size. I used street lights as in my script "the mysterious room" has no other lighting than the street lights through the cracked window.


Adding another layer, I used "free transform" to change the size of the image to fit behind the window frame. Using the blur tool, I blurred the image of the forest to make the window look as if there is actually glass there.
I then used a crack effect to make it seem as if the glass had been smashed due to the decay and neglect of the room. 

Tuesday 19 January 2016

Typography Mock-Up


My first font that I chose was Bernard Condensed. Once I imported it into pixlr, I added another layer onto the font. On the layer, I used the brush tool to add smudges onto the font making it look old and worn.


I then added another layer. On this layer, I used the "dirt" brush tool and added an effect onto the corner of the typography. I did this so that when on the page, it would have a whole neglected effect.
My second typography mock-up font is "Party LET". I used this font because the curls and flicks on the font looks child like. However, the rigid/shard edges on some of the letters makes it look creepy.
On powerpoint, I used the "glow" effect so that around the edges of the white font, there is a darker colour "glow" around the outside.
I added another layer onto the typography. On this layer, I used a normal brush tool in the colour red to make the bottom of the layers have a sort of faded/red colouring to them. I also used the "smudge" brush tool in red to add a red/blood smudge onto the tall part of certain letters.
On my second layer, I used the crack tool to add a minor effect on top of the typography in the colour red. I added the effect mainly over the work "puppet". Firstly, as the image portrayed to the audience, of the puppet, is rather gory. And secondly, due to the deaths of 2 groups of teens - blood.

Wednesday 13 January 2016

Script


From researching the generic conventions of a horror-genre script, and by researching into my target audience - 
finding their likes, interests and most preferred horror features - I was able to write my script to best fit. 
(both the genre and my audience). I have based this script on 2 groups of teens, one of the groups who begin 
the horror script in 1960s. And the second group who finish it, in present day 2015. The sub genre of my script is 
"Killer Toy", as one of the most popular sub-genre's in my questionnaire was "other". Therefore, by basing my 
script on "killer toy" I aim towards the less common Zombie, ghost or psychological sub-genre. 
I also believe from research, and experience, that even though it is not real, the ideology of a child's
 toy being possessed makes the audience sub-consciously worry and fearful of the things around them 
- having a larger impact.