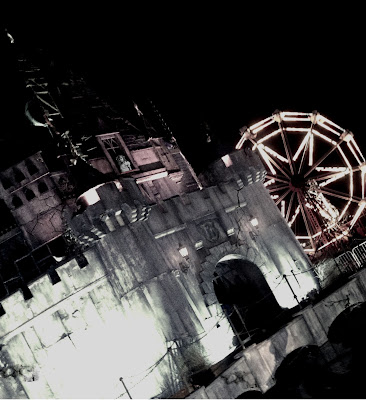
I then cropped the image in Pixlr to make the main focus the Building and the Ferris Wheel. I then firstly edited my image by changing the colouring to "Old Photo" and adjusting using the "Brightness and Contrast".
I then added a layer onto the image. I did this so that I could add other edits and easily change them without undoing the whole thing. In this layer I used the brush tool/crack effect to add cracks onto the front, side and bridge of the building. This then made the building look more neglected and old, rather than new (like it actually was).
Using an image off of the internet for the time being, I cropped a young girl so that only the top half of her body was left. 
After I finished cropped the girl, I added my 2ND layer. I then added the cropped out, young girl on my image. I used "free transform" and "free distort" to fit her properly into the window of the building. Even though she is not very noticeable and does not play a large part in the image, it adds to the atmosphere that someone is always watching. 
On my 3RD layer, I used the ordinary brush tool in the colour black to remove the top section of the original (castle) to make into a smaller size of a building. This effect also makes the building look less "together". In addition to this, on this layer I made the 'old photo' effect darker again; portraying the idea in my script that there was not much light.
Finally, I added my last layer which was so that I could add the title of my horror film. Once i added the title onto the main image, I changed it colour effect to 'old photo' to match the rest.
Mock-Up Teaser Poster 2.
 |
| Once I inserted the picture into Pixlr; using the filters I changed the effect of the photo to "old photo" to firstly represent the time era (1960s) and to represent the abandoned atmosphere. |
Again, on the internet I found and saved an image of a window and using pixlr I cropped the image so it was just the frame. I also put cracks using the brush tool in two corners of the window frame.
I then (on another layer) added the cropped frame onto the grunge wall background. Using the black brush tool, I went around the edges of the frame to give it a minor shadow. Also using the "dirt" brush tool I added smudges onto the "window pane" to look as if the glass was ruined.
I then researched "street lights to find an image I could use for "outside the window". On Pixlr I cropped the image down the size. I used street lights as in my script "the mysterious room" has no other lighting than the street lights through the cracked window.
Adding another layer, I used "free transform" to change the size of the image to fit behind the window frame. Using the blur tool, I blurred the image of the forest to make the window look as if there is actually glass there.
I then used a crack effect to make it seem as if the glass had been smashed due to the decay and neglect of the room.


No comments:
Post a Comment